• Skip to primary navigation
  • Skip to main content
  • About
  • Tonic
  • Resources

Whole Body Revolution

Rewire yourself for greater health, happiness and success.

Sukie Baxter

March 25, 2019 Pain Relief

3 Steps for Healing Trauma in Your Body

You may have heard that the body hangs onto emotions long after events have passed. Traumas from childhood — even seemingly minor things like a friend’s snide comment or your mother snapping at you one morning over breakfast — take root in your muscles and affect your thoughts well into adulthood.

But how does this cellular memory work?

The fact is, embodied memory isn’t some airy-fairy, woo-woo, magical phenomenon. It has real basis in your neurology. This makes a lot more sense when you reassess your view of the mind-body connection and realize that, in fact, your brain is embodied.

The Embodied Brain

Those three pounds of gray matter lodged between your ears don’t just stop at the base of your skull. Your neurons condense down into a thick rope that runs through the core of your vertebra. We call this the spinal cord, but it’s really just an extension of your brain.

And then that spinal cord branches out into thousands, maybe even millions, of tiny nerve fibers that innervate muscles, organs, joints, and bones. Your brain lives in your body exactly as much as it lives inside your head.

And here’s the really interesting thing: your body is sending data to your brain almost more often than your brain checks in with your body. The heart, for example, contains sensory nerve bundles that send information to the brain about nine times more frequently than the brain sends signals to the heart.

The Basis for Trauma

I’ll be honest, I don’t love the word “trauma.” Why? Because it’s really loaded. We have all kinds of conditions around what we consider to be a “traumatic experience.”

In reality, trauma is subjective. As psychologist Peter Levine says: trauma is in the nervous system, not the event.

Meaning: the event is actually irrelevant, and what actually matters is how the person processes the event. If a person has sufficient resources at the time of an accident, injury or emotionally charged event, their nervous system will undergo a normal activation followed by a discharge and then move on without negative impact.

Dr. Levine has observed this process in wild animals. A tiger chases a gazelle, and the prey manages to escape. After the tiger gives up and goes off to stalk his food elsewhere, the gazelle shakes her whole body, discharging the stored fear in her nervous system. Moments later, she’s calmly grazing with the rest of her herd.

As humans, however, we don’t always have sufficient time, space, or resources to process our traumatic experiences, and that’s when scars form in our bodies.

The Story Is Irrelevant

I know that can be really triggering for some people. Unfortunately, a lot of therapy focuses on the story so heavily that many people begin to identify with their past in a deep way.

They label themselves: I am traumatized. I had this horrible experience. Because I had this experience, I am damaged. And then that becomes part of their personal identity.

I’m not denigrating the negative experiences that people have. There are some terrible, heart-wrenching things that happen in the world. What I’m saying here is not that you should just buck up and be stoic but rather that we have to expand our treatment of trauma to include the body for whole-person healing.

Here are three steps to cellular healing that will clear painful emotions from your body.

1. Choose a memory.

The first step to embodied healing of your past is to select a memory that you would like to work with. I recommend starting with something small at first. You can make a brief list of emotionally charged memories and then categorize them as green, yellow and red.

Green memories are things you may have found irritating or annoying, but they don’t cause you alarm or panic. Yellow memories are a bit more charged. Red memories are those that you feel profoundly scarred you and affect your thoughts, beliefs, and current relationships in a very deep way.

Trust me, you don’t want to go for the gold on this one until you have your sea legs. Just start with a little memory until you get a feel for the process. In somatic healing, less is more.

I’m going to say that again for the overachievers in the room: less. is. more.

2. Feel it in your body.

Once you’ve selected a memory, mentally put yourself back into that situation. Maybe it was a friend saying something hurtful, or an offhand remark from a relative that cut you a bit too deeply. Or maybe it was a time when you fell off of your bike and scraped your knee.

Whatever the story, start to think of what happened before the event took place, and like a movie, play back the event in your mind’s cinema.

As you do this, shift your attention to your physical body. What do you notice happening? What parts of your body stiffen, tighten or respond as you recall this event?

List the sensations you feel without analyzing or judging them. Just describe them. Sensation is your body’s language, and the mind has a tendency to want to interject all kinds of interpretations on top of your body’s communication, so try to curb that.

Ask yourself, where do I feel this? How big is this sensation? Is it heavy or light? Does it have a color associated with it? Does it feel dull, sharp, jagged, ropey, thick or something else?

Once you have a clear sense of your body’s response to the memory, move on to step three.

3. Clear the memory.

This is where the magic happens. Now we’re going to clear the memory from your body. Because the mind loves to jump in and control things, we’re going to give it a mantra to keep it busy while the body does its healing work.

Gently put your attention on the sensation you identified in step two. Stay with that while you say, either in your head or out loud: I forgive you. Thank you. I’m sorry. I love you.

(h/t to Denise Duffield Thomas for this forgiveness mantra.)

With your awareness, track the sensation in your body. How is it changing and shifting? Note: it might get worse before it gets better. That’s okay.

If you need a break, just shift your attention to the feeling of your feet on the floor. Open your eyes and take in your surroundings. Once you feel calm and centered again, you can return to the practice.

Remember, less is more. Don’t gut it out — seriously. You don’t have to suffer in order to heal.

While repeating the mantra and focusing your attention on your body, I find it very helpful to alternate gentle tapping on the top of my head and on my sternum. While tapping is widely used in ancient healing practices, I learned this one from Bodytalk.

Theoretically, tapping the head stimulates the brain to build new connections, and tapping on the heart “saves” this information in your body. Does it really work?

As Denise Duffield Thomas says (total side note, her book is awesome, highly recommend), who cares! All of it helps a little bit.

Anyway, continue focusing, tapping and mantra-ing until you feel the sensation in your body shift, dissipate and dissolve. If you’ve selected a green-light memory, this may go very quickly. Or, you may discover that what you thought was a green-light memory is actually covering a snake pit of red memories.

No worries. The tension in your body doesn’t have to dissolve completely. If it does, fantastic, but even a tiny shift toward relaxation is progress.

When you feel the tension dissipate, you can stop tapping and mantra-ing. Open your eyes and notice how you feel overall.

Bonus Points

Now is a good time to create a more constructive mantra to take the place of this old story you’ve just cleared. Choose something positive, avoiding words like “don’t,” “won’t,” and “can’t.”

While syntax does play a role in your brain’s ability to process negative words, positive statements take less energy to interpret.

If you’re stuck, here are a few good basics:

I am safe.

Every cell in my body is completely healthy.

I am a kind and loving person.

I am doing my best, and that is good enough.

For extra credit with this mantra, revisit step two above. As you repeat these words over and over to yourself, what do you notice happening in your body? Do your muscles relax, your jaw stop clenching? How does your breath respond?

Spend time reveling in these positive sensations. This is more than just a mind exercise. Pleasurable physical sensations signal to your brain that you’re safe and that you can relax. They activate your parasympathetic nervous system, which is responsible for rest and digestion.

Living in parasympathetic rather than in chronic sympathetic — fight or flight — lockdown also boosts creativity, deepens interpersonal relationships and empathy, improves gut function, slows heart rate, decreases blood pressure and generally improves your mental and physical well-being.

Parasympathetic is where you want to live on a daily basis for optimal focus, energy, and happiness.

To Go Deeper, Get Support

Whew. That was a lot.

If you want to go deeper with this practice, I recommend adding intentional movement into the mix. Here’s the thing: when trauma takes up residency in your body, usually that can be seen as frozen places that don’t move well.

Over time, the muscles in this area become tense, stiff, dehydrated (like beef jerky — really, it’s kind of icky) and ultimately painful. Then, most people get this random advice to stretch more. That’s great. We should all move and stretch a lot daily.

The problem is, you’ve got this giant frozen area of your body that your nervous system can’t access. It’s like a piece of you went missing.

(And yes, this has distinct parallels to soul death or soul loss as viewed from traditional shamanic healing practices.)

You can go to the gym and do yoga and even get contortion-level bendy but still not move through and release these frozen areas of your body.

I work with yogis, weight lifters, crossfitters, circus arts performers and even contortionists all. the. time.

They still have these frozen areas in their bodies. They all benefit from this intentional defrosting of their muscles.

The truth is that exercising simply isn’t enough. To really, truly, fully release frozen areas of your body, you have to kind of sneak up on them in a non-threatening way. Seriously. I know that sounds weird, but think of it this way:

The trauma in your nervous system is a scared cat. You’ve seen one of these before — eyes wide, jerky movements, tense all over, crouching and cowering, ready to run for safety if you should even so much as breathe wrong.

You’re going to walk up to that scared cat and pick it up. (Substitute dog, bunny, horse, or whatever other animal you love if you’re not a cat person.)

(Maybe not horse. Those are too big to pick up.)

Do you run up to the animal with big movement yelling loudly how much you love it? Probably not. It’s going to run away.

Instead, you approach quietly, softly, speaking in low tones. You may avert your eyes. You certainly don’t broadcast “I’m going to pick you up” body language. You’re in stealth mode.

Well, your nervous system needs the same quiet, cautious, reassuring treatment in order to feel safe enough to release deeply held scars. Anything less will only perpetuate the tension and the problem.

So, what do we do about all of this? This is precisely why I created the videos in my Posture Rehab course. On the surface, it’s about standing up straighter. But these practices communicate deeply to your nervous system, gently dissolving all those old patterns that you’ve been holding onto for years — maybe even decades.

posture rehab buy now

Why videos? Let me be frank: the hands-on work that I do in my practice is life changing. But, not everyone can come to see me. And, in all honesty, this process is not a one and done kind of deal.

You don’t lift weights once and suddenly you’re strong. One yoga class does not a yogi make. Well, one bodywork session doesn’t dissolve your entire life history, either.

Practice makes perfect. You can take this process as deep as you would like. There is always a new level of healing available if you would like to grow there, but fortunately the basics work at every level.

And that’s why the videos. Because you need access to these not for a week or a month or a year, but for a lifetime. Because this process is life changing, if you let it be.

Right now, I’m offering access to 31 body-healing practices personally led by me for $295, which is less than the cost of two in-person sessions with me.

If you’re just so over being stuck in your past, and if you’re looking for something that works differently from everything you’ve tried before, click here to buy the Posture Rehab program now >>

Seriously, you have nothing to lose, except your limitations.
March 18, 2019 Healthy Aging

10 Tips to Increase Flexibility that You Won’t Learn in Yoga

Disclosure: I make it a point to recommend products that I know work. To be totally transparent, you should know that some links in this article are affiliate links, meaning — at no additional cost to you — I will earn a bit of pocket change if you click through and make a purchase.

Did you know that 72% of people wish they were more flexible?

Okay, I totally made that up. But if my experience talking with clients is any indication, there are a lot of folks who would like to be a bit more bendy.

Flexible muscles don’t just make your body feel better; stretching is good for the mind, too. Releasing tension in your body relieves mental stress by calming your nervous system and deepening your breath.

A lack of flexibility is more noticeable as you age and your tissue quality changes. Tendons lose their elasticity, cartilage thins and the fluids that lubricate joints decrease over time. However, this doesn’t mean you just have to live with a stiff, immobile body.

Regular flexibility and mobility practices can keep joints and muscles healthy for the duration of your life, and while yoga is great, these ten tips will help you get the most out of any stretching routine — yoga-based or otherwise.

10 Tips to Increase Flexibility

No. 1  Make it dynamic

Dynamic stretching is the latest and greatest technology for increasing flexibility safely, although it has actually been used for thousands of years in practices such as tai chi and chi gong.

Basically, to make any stretch dynamic, you add movement, taking your joints through a full range of motion. If you typically drop into a stretch and hold the static pose for a prolonged period of time before moving on to the next one, you’re missing out on the great benefits of dynamic stretching.

Dynamic stretches engage more muscle fibers instead of just a single line of tissue, as happens in static stretching. They activate your central nervous system and force muscles that are clenched too tightly to relax in a non-threatening way.

(Attacking muscles that are in mild spasm head on is like trying to push a brick wall out of the way – an exercise in frustration.)

Dynamic stretches also lubricate your joints, increase balance and get your blood flowing. They’re great to use pre-workout because they prepare your body for exercise without increasing the risk of injury. There’s significant evidence that static stretching prior to exercise makes you more likely to damage a muscle or joint.

No. 2  Reduce inflammation

There are two aspects to flexibility. The first is structural — basically, how stiff or flexible your physical muscles are.

The second relates to your body’s internal physiology. Westernized lifestyles are pro-inflammatory, meaning they increase the level of inflammation circulating throughout your body.

Inflammation is your body’s natural and healthy response to injury.  If you twist an ankle, your body uses inflammation to make blood vessels more permeable, allowing plasma and leukocytes to do their healing work, which is good. But inflammation becomes a problem when it’s chronic, ongoing and systemic.

Chronic, systemic inflammation causes your body to create excessive fibrin, a type of tissue that forms a mesh and impedes blood flow. Too much fibrin actually increases the risk of cardiac arrest and stroke, but the first signs you might have too much fibrin include chronic fatigue, slow healing times, and pain.

If you tend to get very sore after even light bouts of exercise, for example, or if you wake up stiff and achy in the morning, you might have systemic inflammation.

Processed foods including white flour, white sugar, high fructose corn syrup, and an over-abundance of omega-6 oils increase inflammation, as do stress, lack of movement, and poor sleep quality. Fortunately, there are simple things you can do to decrease your systemic inflammation.

The most obvious is to cut out processed foods that are pro-inflammatory and start eating more green vegetables and lean, organic, pastured meats (grass fed beef, free range chickens, basically animals kept the way nature intended and not loaded with hormones and antibiotics).

Second, you can add the natural anti-inflammatory spices ginger and turmeric to your diet.  Turmeric, used in Indian curry, is bright orange in color and contains the active ingredient curcumin that reduces inflammation. Ginger also packs an anti-inflammatory kick as a result of a compound called gingerols.

Third, you can supplement with proteolytic (protein eating) enzymes. Your body produces enzymes naturally and they’re required for virtually every metabolic function, but enzyme production drops off as you grow older.

Proteolytic enzyme supplements are enteric coated to survive the acidic environment in your stomach, so they are absorbed through your intestines into your bloodstream. They then go about “cleaning up” all the garbage floating around in your blood – viruses, fungus, and anything that can cause inflammation, including excess fibrin (which is a boon for cardiovascular health).

Enzymes are considered safe even in high does, except for people who are taking blood thinning medications as enzymes thin the blood even further.

No. 3  Trick your nervous system

While excessive fibrin can cause pain and inflammation that make you physically stiff, the majority of flexibility issues come not from your muscles but from your brain.

When you stretch, you’ll get to a point where the muscle feels tight and painful. This isn’t actually the physical end of your muscle. You’ve activated something in your nervous system called the stretch reflex.

Your brain has a set point for every muscle in your body, telling it how long and how short to be.  When you reach the end of a muscle’s programmed length, the brain initiates a contraction to keep you from going any further.

If you were under anesthesia, the medical staff would have to be careful moving you so as not to dislocate a joint because your muscles would be so loose we could probably tuck your feet behind your head. But as soon as you woke up, you’d be just as tight as you were before. This is because your brain and its neural set-points (like brakes to your flexibility) came back online.

The stretch reflex has a purpose, though. It keeps you from going into a range of motion where your muscle is too weak and there is risk of injury. So, for example, if you bend over to touch your toes and hit the stretch reflex before you get all the way down, your brain is afraid that if you go any further, your muscle may be too weak to support your weight, or it might not be able to bring you back up, thereby resulting in damage to your hamstrings, or possibly your spine.

You can (safely and incrementally) trick your nervous system into letting go in greater and greater range, though. As a result, you’ll develop better strength and flexibility along the entire length of the muscle.

No. 4  Breathe Deeply

Your body needs oxygen more than any other nutrient. You can survive for weeks without food and days without water, but you’ll die in a few minutes without oxygen.

Oxygen is necessary for cells to absorb nutrients and flush out waste products. Chronic stress causes the muscles in your chest and shoulders to contract, restricting your breathing. Additionally, shallow breathing promotes a fight or flight response in your brain, sending the signal that it’s time for action, not relaxation.

Researchers at Harvard have found that body position and posture profoundly influence brain chemistry So, if you’re constantly taking shallow breaths, you’re promoting stiffness in your muscles due to a “stressed out” brain and poor nutrient uptake in your cells.

Take five to ten minutes a day to practice deep breathing.

No. 5 Keep Hydrated

After oxygen, water is the most needed nutrient for your body. A lack of sufficient hydration causes tissues to dry up and blood to become thick and clotted. There isn’t enough fluid to wash away metabolic waste products — your body’s version of car exhaust.

Dehydration leads to stiff, tight muscles. Just imagine the difference between a nice, juicy steak and beef jerky. Dehydrated tissue starts to look and feel like beef jerky as it loses its elasticity and “bouncy” quality.

Since you lose water through respiration, sweat and urination, you’ve got to constantly replenish in order to meet your body’s needs. How much you need to drink depends on your height, weight and activity levels. Beverages like coffee, tea and alcohol increase dehydration, so if you consume these regularly, you’ll need to drink additional fluids to compensate.

No. 6  Stretch Your Psoas

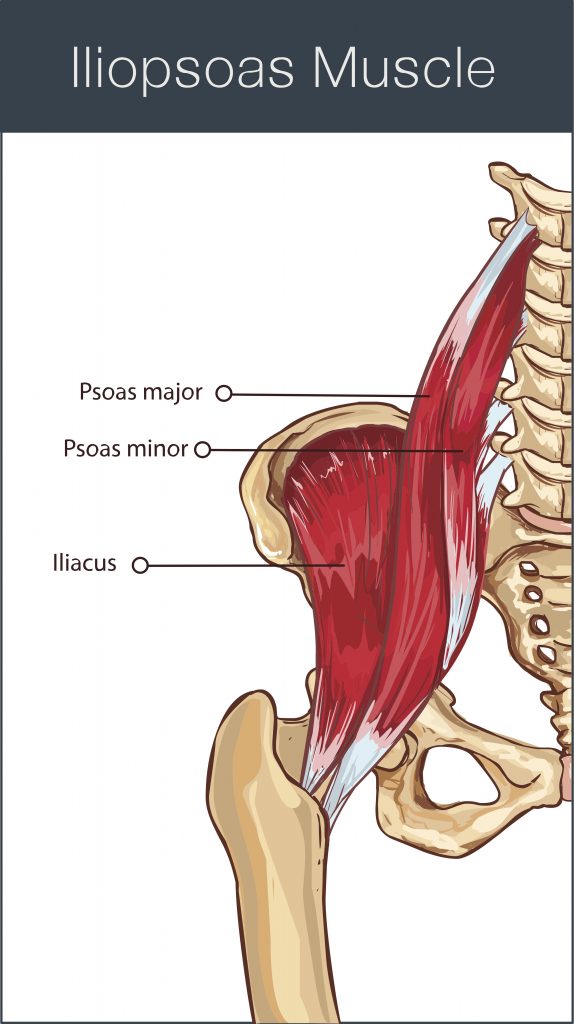
You’ve probably never heard of a psoas before, much less know how to stretch it. The psoas is a deep abdominal and hip muscle that originates just below your diaphragm on the front of your spine, runs behind your internal organs, around the front of your hip and attaches to the inside of your femur, or thigh bone.

Muscles of the deep abdomen and upper leg related to core locomotion.

It has two actions: the psoas flexes the hip, or, if the hip is fixed, pulls the lumbar spine forward creating a “sway-backed” appearance. The psoas is primarily indicated in cases of lower back pain because of its deep action on the spine and the predominance of sitting (which tightens the psoas) in western cultures where back pain is an epidemic, but a tight psoas has far reaching effects.

Tension in the psoas often shortens the trunk, or core, pulling the rib cage down and ultimately restricting shoulder flexibility (if you can’t raise your arms straight overhead and get your elbows behind your ears, you likely have a tight psoas, among other problems).

A tight psoas also creates a walking pattern that inhibits glute and hamstring function while simultaneously tightening those pesky hip flexors. Getting flexibility in your psoas will translate to more flexible hips and shoulders.

While your psoas is quite a deep muscle — in more ways than one since it’s also linked to survival emotions such as fear — it’s relatively easy to give it a good stretch.

No. 7 Use Far Infrared Heat to Deeply Warm Muscles

The warmer your tissue is, the more flexible it will be. Heat increases circulation. Increased blood flow also brings more nutrients into the tissue while simultaneously flushing out waste products.

Heating pads are nice, but they only warm the surface of the skin. In order to get deeper heat with a heating pad, the surface temperature would be so hot that it would burn your skin before it reached deeper layers of your muscles.

Far infrared heat penetrates the muscles and tissue, warming up to three inches deep. Far infrared is a solar spectrum that comes from the earth’s sun. It’s not harmful to your skin like ultraviolet light. Rather, it’s the spectrum that makes you feel the sun’s warmth even on a cold day.

Have you ever been outside on a brisk fall day and felt warm in the sun but cold when a cloud covers its light? That’s far infrared heat in action. The cloud can’t instantly decrease the ambient temperature, but it blocks the far infrared heat, making you shiver.

Fortunately, you don’t have to have the sun to use far infrared heat to increase your flexibility. There are far infrared heating mats available for home use. As a bonus, I find that I’m much warmer overall when using my far infrared heating pad in the winter, and I’m able to keep my home cooler while still being comfortable.

The only caveat with far infrared heat is to be careful not to overstretch your muscles.  They’re very warm and pliable, and you don’t want to injure yourself, so don’t be too aggressive in your stretching or you could tear something.

No. 8 Pick Just One Goal

People who want to gain flexibility often have a vague notion of what that means. “I want to be more flexible” isn’t specific enough to get you results, and trying to stretch every muscle in your body is counterproductive.

That’s like saying you want to be a marathon runner and a professional weight lifter and a flamenco dancer all at the same time. Yes, you can do it, but you have to start with one and get really good at it before you move on to something else.

If you want to increase your flexibility, choose one area of your body that you want to work on.  Usually it’s the hips or the shoulders. You can get more specific with “hamstring muscles” or “pectorals,” but I much prefer to choose a range of motion you’d like to achieve.

If you want to get your arms over your head with elbows straight and behind your ears, focus on that.  If you want to be able to drop into the splits without effort, work every day to accomplish your goal. Increasing flexibility in one area of your body, like increasing strength in one area, often translates to increased flexibility in other areas.

No. 9  Engage Two-Way Lengthening

Perhaps the most helpful thing I can teach you is how to use two-way-lengthening to increase flexibility. It’s a little bit difficult to conceptualize until you physically experience it, but it will vastly increase your results once you do.

What is two-way-lengthening? It’s what gives dancers their grace. Two-way-lengthening is the process of stretching in two directions at once. It requires a great sense of your body to accomplish, but once you do your friends will ask you if you started taking dance classes (people ask if I take ballet all the time…I don’t and haven’t since I was in the first grade).

In Kung Fu martial arts, they refer to this as heaven and earth and incorporate it into many of their exercises.

Try It Out

Start by simply standing. Feel your feet on the floor. Gently press your feet downward with the whole surface of the sole of your foot. If it helps, imagine you’re melting them into hot wax.  Notice how the downward pressure immediately lengthens your body upward as well.

Then, maintaining that sense of downward pressure, shift your attention to the top of your head.  Lengthen it upwards toward the ceiling, as though someone had a hook in the sky that was holding your head up.

Feel how this sensation elongates your body? You can use this all over the place:

When you’re stretching your hamstrings, lift your tailbone as you press your heels down into the ground. Now you’re stretching in both directions.

When you reach your arm out to the side, extend outward through your fingers while also pulling your shoulder back toward your body. Two way lengthening at work.

If you’re finding this hard to visualize or don’t really feel it in your body, think of a rubber band. Imagine the band is looped around something fixed, like a piece of furniture. You have a hold of the other side and you are pulling it away from the furniture. This is single lengthening as the band is only stretching in one direction: from the fixed point to your hand.

Now imagine you have the same rubber band in both hands (no furniture or fixed point) and you pull with equal force in each hand stretching the band. Now the band is lengthening in two directions away from the midline. This is what you are trying to accomplish with your muscles.

No. 10 Use Your Brain

Athletes use visualization to take their performance to the next level. They run through their sporting event in their mind, imagining themselves achieving their absolute best.

Researchers have found that muscles respond to visualization. Muscle activity was measurable in weight lifters who merely imagined exercising, and simply thinking about working out can increase muscle strength by around 13%.

Similarly, you can leverage your brain to increase flexibility. Remember, it’s the brain that controls the length of your muscle, so it makes sense to approach flexibility from a “software” perspective as well as a “hardware” approach (i.e. the actual exercise of stretching).

There are two ways to engage your brain to increase flexibility. The first is to envision the shape that you’d like to make, like dropping into the splits or touching your toes in a forward bend. Imagine how achieving that shape would feel in your body if you actually did it.

Then when you perform your stretches, try to get your body to a place where it matches what you imagined.

The second way to engage your brain is to use the power of suggestion. The human subconscious mind is very open to suggestion, so whatever you tell yourself on a regular basis becomes your reality.

Most people are telling themselves that they are getting older, weaker and less flexible with each passing year. Start telling yourself that you are getting more flexible all the time. When you’re actually stretching, focus your attention on the muscle that feels tight and tell yourself that you can feel it lengthening, getting more flexible, relaxing.

Inhale deeply and when you release your breath, consciously relax the muscle you’re stretching a little bit more. If you’re too uncomfortable to relax, back out of the stretch a bit and make it easier on yourself.  The nervous system doesn’t like to be attacked. You’ll get more mileage if you keep stretching within your comfort level.

Put It Into Action

These flexibility principles will augment any stretching or mobility practice you already have in place. You can implement them in yoga, Pilates, or during your pre-gym warm up and cool down routines.

If you’d like more detailed instruction on putting these into practice, you can find specific exercises that actively use these flexibility principles in the Posture Rehab video course. There are 31 videos with complete, step-by-step exercises designed to reset your nervous system, increase flexibility and mobilize your joints.

posture rehab buy now

March 11, 2019 Posture

Do Posture Correctors Really Work?

Note: this post contains affiliate links. 

Hunched shoulders and a rounded spine might have you wondering: do posture correctors really work?

There are so many posture correcting devices on the market. Each one is supposed to help you stand up straighter. From shoulder braces to high-tech wearables that buzz when you slump over, the options are endless.

Seems like a great idea, right?

A brace to hold your shoulders back, a gentle buzz to remind you to sit up straight…

But what you don’t know about posture correctors could actually be hurting you…and your pocket book.

So before you go shelling out $80 (or more!) for posture training devices, here’s everything you need to know from a posture pro about whether these things really do their jobs.

Related:

  • The Best Office Chair for Sitting Long Hours, According to A Posture Expert
  • Computer Posture: How to Work at A Desk All Day Without Destroying Your Back
  • Perfect Posture For Life: How To Finally Stop Slouching, Stand Tall And Move Freely (Even If You Sit At A Computer All Day)

Posture Braces

What they are:

Soft, elastic material that wraps around the front of your shoulders and attaches around your rib cage.

What they’re supposed to do:

Hold your shoulders back and keep you from slouching or hunching over.

Cost:

$25-$40

Do they work?

Generally speaking, I’m not a fan of posture braces of any kind. Why? Because your body is designed to move, and no joint is more inherently mobile than your shoulder.

The humerus — or upper arm bone — attaches to the shoulder in a very shallow ball and socket joint. It’s so shallow, in fact, that it’s easy to dislocate. Your hip, also a ball and socket joint, is so much deeper than the shoulder. When you see the two next to each other, it’s easy to understand that the shoulder joint is meant for uninhibited movement.

Additionally, the shoulder girdle — which is what we call the bones of the shoulder that sit on your rib cage — basically hangs in a hammock of muscles. Your shoulder only has one bony attachment to the rest of your body where your collar bone meets your sternum.

Again, the shoulder is meant to move. Hunched over shoulders aren’t actually a shoulder problem at all — they’re a rib cage problem. Shoulders merely rest on the rib cage like  glass on a table. If the rib cage is caddywompus, the shoulder will be, too — just like a glass set on a wobbly table will also be unstable.

Posture correctors that brace shoulders don’t fix the underlying problem — a collapsed rib cage. And worse, they inhibit shoulder mobility, promoting unnecessary tension.

The verdict:

Don’t buy one.

A better option:

KT tape (Amazon) gives you the same proprioceptive nudge as a posture brace while still allowing free movement and range of motion in the joint.

Posture Wearables

What they are:

Tech devices that you wear on your back to monitor slouching.

What they’re supposed to do:

Wearable tech posture training devices provide a gentle vibration when your body rounds forward, reminding you to sit up straight.

Cost:

$80

Do they work?

Here’s my problem with these devices (okay, a couple of the problems I see): they in no way provide input on how the person achieves upright posture. They simply measure the position of the device.

I’ve been practicing with real clients — real, live human bodies — for nearly fifteen years now. Let me tell you, if you ask a person to sit up straight, it’ll reveal some interesting neural patterns. We all think we know what straight is, but many people are still sitting on a tucked-under tailbone, hyperextending their lower backs, or craning their necks to hold up collapsed rib cages.

These devices say that 92% of users report improvements to posture when worn. I’m asking: how is this measured? Is it based on app reports of how often the device needs to buzz at you to make you “sit up straight?”

Because that’s not a really great metric. A wearable that truly measured posture would take into account way more than just the position of your upper spine. It would assess lumbar curve, pelvic orientation, muscular engagement of the lower back, and so many more data points.

Also, holding your body in an upright position frankly isn’t all that useful. Of course, culturally speaking, we have a very rigid definition of posture. We assume it’s a snapshot on the cover of a magazine. But the reality is that posture is a mode of expression. Yes, it’s influenced by your daily activities, be they sitting in front of a computer, driving for hours, weight lifting, yoga, running or anything else.

But posture is dynamic. It’s the result of a lifetime of neural conditioning. Good posture isn’t about holding one single static position for hours on end, it’s about having a multitude of options.

In fact, studies have repeatedly shown that posture is a terrible metric for physical health. It doesn’t seem to have much of an impact on back pain, either. Why? Because when we’re measuring “posture,” we’re measuring something static.

(It should be noted that posture does matter, but it requires a bit of a shift in how we understand what posture actually is.)

The verdict:

Nope, don’t like ‘em. Your money would be better spent on a luxurious dinner out.

A better option:

Consult a pro, someone who can realistically assess your body and help your brain find new, more efficient neural pathways so you don’t have to constantly “mind” your posture.

Also, set up a more ergonomic workstation.

Lumbar Support Cushions

What they are:

Pillows that work to support the lumbar curve of your lower back.

What they’re supposed to do:

Alleviate pain by making it easier to sit up straight, thereby taking strain off of the muscles of your lower back

Cost:

$15-30

Do they work?

Here’s the thing about lumbar supports: they’re behind your body, meaning you have to lean backwards to get any benefit. When you’re sitting in an upright position, the weight of your body compresses downwards, not backwards.

So, lumbar supports do work, but only if you’re already reclining and not sitting up straight. I’ve found that, in general, lumbar supports tend to promote slouching rather than correct it.

Also, due to the over reliance on hip flexors in daily activities (sitting), most people already have too much lumbar curve.

The verdict:

Not worth it.

A better option:

Most people would benefit more from learning how to sit properly in the first place. Lumbar supports are only helpful to correct already poorly set up workstations. Simply raising a person’s seat so that their hips are above their knees will do wonders for lower back strain.

The Bottom Line On Posture Correctors

Ugh, are you feeling a little depressed that posture correctors aren’t worth their hype? I feel ya. I know what it’s like to want to fix your body in the worst way but not know exactly where to turn.

The good news is that fixing poor posture actually isn’t all that hard once you understand why muscles get tight and cause those hunched shoulders in the first place.

That’s why I created the **free** Pain Free At Any Age video series that will help you heal your body in no time.

Click below to get access and start living with less pain today.

March 6, 2019 Pain Relief

You don’t have to suffer from stiff muscles and aching joints

Over and over again, I hear this from my clients: “I have been to physical therapy, tried yoga and Pilates, seen a chiropractor and had massages, but by far the best results I’ve found have been from working with you.”

Why do I get results for people suffering with back pain, stiff necks, tense shoulders, sciatica, scoliosis, and a bunch of other uncomfortable conditions when other methods fall short?

While I’d love to tell you I’ve got some sort of exclusive magic, the truth is it’s a lot simpler than that. The reason this work works is because I focus on the nervous system.

The Neural Factor

You see, muscles aren’t just meaty rubber bands that randomly get tight for no reason. Your muscles are controlled by a sophisticated software system — your brain. It’s nerve signals that tell muscles to contract or relax.

The problem is that accidents, injuries and chronic stress all contribute to muscle tension, and over time tension becomes the habit — your default neural set point.

Ever heard the saying “everywhere you go, there you are?”

Well, everything you do, there’s your neural pattern. So when you plant your hands in down dog or crank out a Pilates 100, you’re activating your unique neural pathways — almost like a personal movement signature.

That’s why traditional approaches often make good changes initially but sort of plateau at some point along the line. You get stuck in your own neural patterning. In order to break through this plateau and restore flexibility, you have to create new neural pathways.

A Different Approach to Improving Mobility

Fortunately, it’s a lot easier than it sounds. While this is the basis of the work that I do one on one with clients, there are also exercises that you can do on your own at home.

They’re easy, require virtually no equipment, and you can start to see changes in five to ten minutes (that’s about the same length of time it would take to watch two adorable cat videos on Facebook, for reference).

This is why I created Posture Rehab, a video suite designed to dissolve tension in your body and hit the reset button on your brain. That way, you can stand taller and move freely without tension, aches and pains.

Sound good to you? Click here for everything you need to know about the program — what’s included, a complete table of contents, FAQ, etc.

Posture Rehab isn’t yoga or Pilates — and it’s not designed to replace these practices either, but rather support them so you get more benefit out of doing them.

Learn more >>

The Bottom Line

Listen, daily pain that saps your energy, degrades your focus, makes you cringe when your kid jumps into your arms, and wakes you up at night does not have to be your reality — no matter what your age. You can feel good in your body.

In fact, you have the right to feel amazing. Life is ridiculously short. Don’t spend your precious days in a fog of pain, limited by what your body can — and can’t — do.

posture rehab buy now

March 4, 2019 Posture

3 Exercises to Strengthen Your Core for Better Posture

Core strength has been a buzz topic in the fitness world for a number of years now with everyone from personal trainers and physical therapists to medical doctors recommending abdominal exercises to those suffering from back, neck and shoulder pain.

But you might be surprised to know that most people are doing it wrong and actually causing more posture problems, pain, and tight muscles. Eek!

So should you stop doing core strengthening exercises altogether? Well, no. Core strength is important for good posture, a strong spine and overall physical health. But you want to make sure you’re doing the right exercises to strengthen your core without causing more damage to your body.

Here are my top three core strengthening exercises that everyone should be doing:

No. 1 Overhead Carry

Why It Works

The whole point of core strength is to support your body in movement. Basically, you want whatever you’re doing in the gym to translate to real life, and frankly, exercises that isolate the muscles of your trunk don’t really help you schlepp three bags of groceries, a toddler, and a 7 lb laptop from 2006 up three flights of stairs, balancing the whole lot while you fish your keys out of your bag to pry open the front door.

A truly strong core allows movement to travel through it. There is a difference between strong and resilient and just plain braced. A braced core will restrict spinal mobility, which ultimately leads to stiffness, back pain, muscle spasms and potentially even spinal injuries like bulging discs and nerve impingements.

Carrying a weight overhead teaches your body how to maintain core integrity while simultaneously allowing movement to travel through your trunk.

How to Do It

Choose a weight that’s challenging but doable for about 20-40 yards. Anything will work for this practice: dumbbells, kettlebells, weight plates, cans of soup. Get creative!

Put one weight in each hand and then either put both hands overhead or position one arm overhead and let the other hang at your side as though you were carrying a bucket.

Then, just go for a walk! Keep your abs engaged as you walk to support your lower back, drawing your belly button inward and upward slightly, but don’t brace so tightly that your hips get stiff and make walking difficult.

Walk 20 yards and if you have your hands in the alternating position, switch sides so the down hand is now carrying weight overhead. Walk another 20 yards. Do 3-5 sets, resting as needed and increasing the distance as you get stronger.

Bonus Points

Use a liquid weight. Filling a vessel with water and carrying overhead adds additional instability that your core has to accommodate. The water sloshes as you walk, making whatever you’re carrying effectively much heavier than its scale weight.

Plus, it’ll whittle inches off your waist! Back when I was competing in kettlebell sport, I would warm up by overhead carrying a keg filled with water around the block. I have never had such a well-defined waist; this exercise really targets your obliques. And no, I never did so much as one sit up, crunch, dead bug, or other such “core exercise.”

Kegs are a good option if you can find an old one (plus, fun for a few double takes from the neighbors). Start with one gallon of water and work up. You could also use those plastic five gallon water jugs, or even a milk jug in either hand.

Sand bags (or grain bags, cat litter, dog food, etc.) would also be a good challenge as they’re also an unstable weight that adds additional difficulty.

No. 2 Side Plank

Why It Works

I’m not a huge fan of plank-planks, as in regular planks on your elbows or hands. I know, sacrilege, right?! Planks are the holy grail of core strength. So, why am I against them?

There are two reasons I don’t love plank-planks, as I call them. One is that they strengthen the anterior line of the body — the flexion line (the muscles that would contract to curl you into the fetal position). Most people are already short on this line due to our flexion addicted society (sitting, way too much sitting).

The second reason is that it’s a static pose. See: overhead carry, above. A truly strong core — not just a tense core — translates movement from the legs through the trunk, shoulders and out the top of the head. A braced core just doesn’t allow this to happen, and that’s where I see a lot of back pain starting.

But side plank? Well now, that’s different. Yes, it’s still a static pose, and for that I’ll demote a few merits. But it’s a good pose because it targets muscles that rarely see any use in modern daily life. It does, in effect, “turn them on,” teaching the brain how to engage the muscles along your sides.

This is helpful because it corrects a common muscle imbalance — the over-reliance on hip flexors and stomach muscles for support and locomotion. And, in fact, one study, albeit small and somewhat poorly conducted, showed that daily side planks reduced scoliosis curvature by around 40%.

What we can glean from this is that activating the muscles along the sides of your spine helps to promote spinal integrity by teaching your body how to hold itself in a more balanced position. This ultimately does translate to better posture in your daily life because it means your muscles will work to keep you upright of their own accord without you having to nanny them with constant attention.

How to Do It:

Side planks are, fortunately, easy for anyone to do (barring injury or other contraindication, of course, check with your doc first in that case) and require no equipment.

Simply get on the floor. Lie on your side and place one hand on the floor under your shoulder. Lift your hips off the floor, stacking your feet on top of each other.

If you can’t support your body on your hand, you can do side plank on your elbow and forearm instead, and if that’s still too much, balance on your knees instead of your feet.

Hold for three sets of 30 seconds on each side, working up to at least a minute at a time. While some doctors suggest only side planking on the weaker side to correct imbalances, I’m not a fan of asymmetrical training.

Instead, only side plank for as long as you can on your weaker side, even if that’ means it’s easy on the strong side. Eventually, the two sides will catch up and be more balanced.

No. 3 Kettlebell Windmill

Why It Works

Most “core” strengthening exercises get conflated with “abdominal bracing,” but as I’ve mentioned, your core needs to be strong, and at the same time, to move. Strength is the ability of a muscle to contract — with control — along its entire length.

The kettlebell windmill is the ultimate exercise for developing such strength + mobility. It both engages your abdominal, back and spinal muscles and also increases hip flexibility. And it feels sooooo good!

This is absolutely the exercise you want to do to avoid that dreaded “I threw my back out” moment where you reach down to swipe something innocuous off the floor like a child’s toy and suddenly there’s a ridiculously sharp stabbing pain your back and you’ve lost the ability to stand up straight.

We don’t want any of that, so grab yourself a kettlebell and get to windmilling!

How to Do It:

Technically you can do this exercise with a dumbbell, too. I prefer kettlebells both because they sit well in your hand and because the weight hangs off center on the back of your arm, upping the ante for your core. It’s more difficult to support an off-center weight. But really, when has your bag of groceries ever been perfectly balanced? The world is an imperfect place, and we should train for it.

Grab your weight — most people will be able to start with a kettlebell ranging from 8 kilos (16 lbs) to 12 kilos (26 lbs). The right weight should be a little challenging to balance but not so heavy that you feel like you’re going to drop it.

Place the weight in one hand and raise the arm overhead. Space your feet wider than shoulder width. If the weight is in your right hand, shift your weight over your right foot and slowly lower your torso to the left until your left hand can touch your left foot. Return to upright.

Check out this video for a visual.

Exercises to Avoid

A lot of core exercises technically target the core, but are a waste of time. Some don’t translate to better function in daily life. Others are downright dangerous because they simply contribute to isometric bracing that, over time, results in spinal degeneration.

Planks are on the list, as mentioned above, as are most types of sit ups, leg lifts, crunches and other such “ab exercises.” You can find a more complete guide to core strength as it relates to posture in the Perfect Posture for Life ebook. Once you know why you’re doing what you’re doing, it’s a lot easier to select the right exercises and strike the ones that are time wasters.

  • « Go to Previous Page
  • Go to page 1
  • Interim pages omitted …
  • Go to page 7
  • Go to page 8
  • Go to page 9
  • Go to page 10
  • Go to page 11
  • Interim pages omitted …
  • Go to page 29
  • Go to Next Page »

Copyright© 2025 · Whole Body Revolution